
Skip to content
Free Excel Tutorials
  • Home
  • Excel For Beginners
  • Excel Intermediate
  • Advanced Excel For Experts

Data Analysis

  • How to calculate correlation coefficient Correlation in Excel
  • Conditional Formatting Icon Sets Examples in Excel
  • Excel Line Chart
  • Working With Tables in Excel
  • How to calculate average last N values in a table in Excel

References

  • How to use Excel FORMULATEXT function
  • LOOKUP function: Description, Usage, Syntax, Examples and Explanation
  • How to get last row in text data in Excel
  • Find Closest Match in Excel Using INDEX, MATCH, ABS and MIN functions
  • How to use Excel TRANSPOSE Function

Data Validations

  • Excel Data validation with conditional list
  • Excel Data validation allow weekday only
  • Excel Data validation whole percentage only
  • Excel Data validation don’t exceed total
  • Prevent invalid data entering in specific cells

Count numbers that begin with in Excel

by

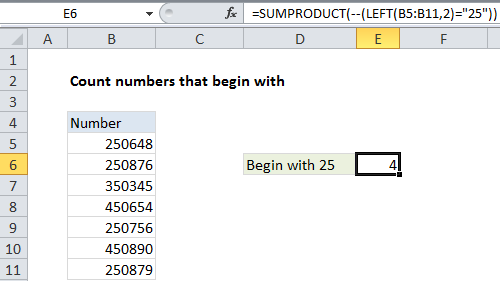
This tutorial shows how to Count numbers that begin with in Excel using the example below;

Formula

=SUMPRODUCT(--(LEFT(range,chars)="xx"))
Explanation

To count numbers in a range that begin with specific numbers, you can use a formula based on the SUMPRODUCT function and LEFT functions.

In the example shown, the formula in E6 is:

=SUMPRODUCT(--(LEFT(B5:B11,2)="25"))

How this formula works

Inside SUMPRODUCT, we use the LEFT function on the range of numbers like this:

LEFT(B5:B11,2)

This creates an array of results like this:

{"25";"25";"35";"45";"25";"45";"25"}

We then compare each value to “25” to force a TRUE or FALSE result. Note that LEFT automatically converts the numbers to text, so we use the text value “25” for the comparison. The result is an array of TRUE and FALSE values:

=SUMPRODUCT(--({TRUE;TRUE;FALSE;FALSE;TRUE;FALSE;TRUE}))

Next, we use a double negative co coerce TRUE FALSE values to 1 and zero, which creates a numeric array:

=SUMPRODUCT({1;1;0;0;1;0;1})

The SUMPRODUCT function then simply sums the elements in the array and returns 4.

Post navigation

Previous Post:

How to use Excel CHOOSE Function

Next Post:

Customize Ribbon In Excel

Leave a Reply Cancel reply

Your email address will not be published. Required fields are marked *

Learn Basic Excel

Ribbon
Workbook
Worksheets
Format Cells
Find & Select
Sort & Filter
Templates
Print
Share
Protect
Keyboard Shortcuts

Categories

  • Charts
  • Data Analysis
  • Data Validation
  • Excel Functions
    • Cube Functions
    • Database Functions
    • Date and Time Functions
    • Engineering Functions
    • Financial Functions
    • Information Functions
    • Logical Functions
    • Lookup and Reference Functions
    • Math and Trig Functions
    • Statistical Functions
    • Text Functions
    • Web Functions
  • Excel VBA
  • Excel Video Tutorials
  • Formatting
  • Grouping
  • Others

Logical Functions

  • IFS function: Description, Usage, Syntax, Examples and Explanation
  • Extract multiple matches into separate rows in Excel
  • Not Equal To ‘<>‘ operator in Excel
  • How to use Excel XOR Function
  • NOT function: Description, Usage, Syntax, Examples and Explanation

Date Time

  • DATEDIF function: Description, Usage, Syntax, Examples and Explanation
  • Convert Excel time to decimal seconds
  • Get project end date in Excel
  • Calculate series of dates by workdays in Excel
  • List holidays between two dates in Excel

Grouping

  • How to randomly assign data to groups in Excel
  • Group numbers with VLOOKUP in Excel
  • Running count group by n size in Excel
  • How to randomly assign people to groups in Excel
  • If cell contains one of many things in Excel

General

  • Excel Operators
  • How to choose page/paper size in Excel before Printing
  • Cell References: Relative, Absolute and Mixed Referencing Examples
  • How to Create Calendar in Excel
  • Share Excel data with Word documents
© 2026 xlsoffice . All Right Reserved. | Teal Smiles | Abbreviations And Their Meaning