Skip to content
Free Excel Tutorials
  • Home
  • Excel For Beginners
  • Excel Intermediate
  • Advanced Excel For Experts

Data Analysis

  • Remove Duplicates Example in Excel
  • Working With Tables in Excel
  • How to create dynamic reference table name in Excel
  • Excel Bar Chart
  • How to do a t-Test in Excel?

References

  • Merge tables with VLOOKUP in Excel
  • How to use Excel OFFSET function
  • Convert text string to valid reference in Excel using Indirect function
  • Count unique text values with criteria
  • Extract all partial matches in Excel

Data Validations

  • Excel Data validation allow uppercase only
  • Excel Data validation don’t exceed total
  • Excel Data validation date in specific year
  • Excel Data validation exists in list
  • Excel Data validation unique values only

Share Excel data with Word documents

by

Why do you need to share data in another file format?

Most of the time, you’ll simply need to paste static Excel data in a Word document

Other times you may want to paste data and then click Linked to Worksheet Object.

Screenshots on how to share Excel data with Word documents and other files

1. Select the Excel data.

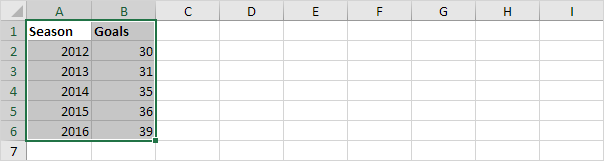
2. Right click, and then click Copy (or press CTRL + c).

3. Open a Word document.

4. Press CTRL + v.

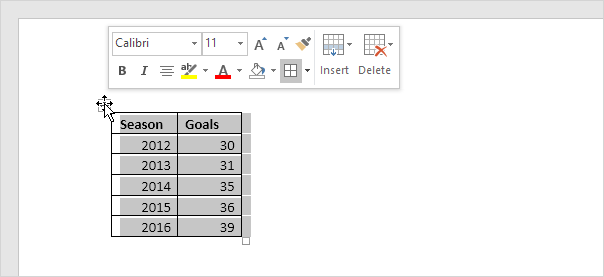
5. Click the icon in the upper left corner of the table and add borders.

Result.

Note: To delete the table, right click the icon in the upper left corner, and then click Delete Table.
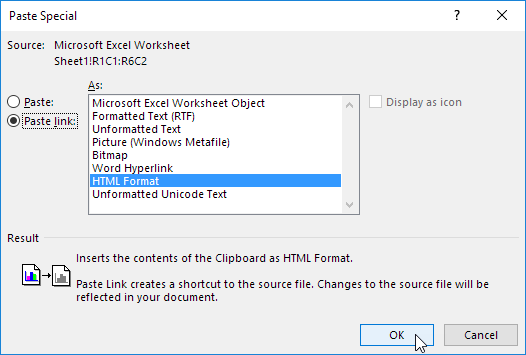
Paste Link

You can also link the source data in Excel with the destination data in Word. If you change the data in Excel, the data in Word is updated automatically.

1. Repeat steps 1 to 3 above.

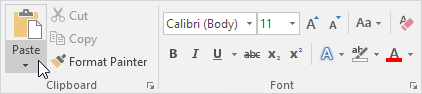
2. In Word, on the Home tab, in the Clipboard group, click Paste.

3. Click Paste Special.

 The Paste Special dialog box appears.

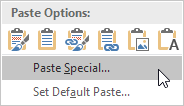
4. Click Paste link, HTML Format.

5. Click OK.

6. Click the icon in the upper left corner of the table and add borders.

Result.

7. Change the Excel data.

Result.

Note: In Word, right click the icon in the upper left corner of the table, and then click Linked Worksheet Object, Links to launch the Links dialog box. Here, you can break the link, change the location of the Excel file, etc.

Post navigation

Previous Post:

TRUE function: Description, Usage, Syntax, Examples and Explanation

Next Post:

Excel Pie Chart

Leave a Reply Cancel reply

Your email address will not be published. Required fields are marked *

Learn Basic Excel

Ribbon
Workbook
Worksheets
Format Cells
Find & Select
Sort & Filter
Templates
Print
Share
Protect
Keyboard Shortcuts

Categories

  • Charts
  • Data Analysis
  • Data Validation
  • Excel Functions
    • Cube Functions
    • Database Functions
    • Date and Time Functions
    • Engineering Functions
    • Financial Functions
    • Information Functions
    • Logical Functions
    • Lookup and Reference Functions
    • Math and Trig Functions
    • Statistical Functions
    • Text Functions
    • Web Functions
  • Excel VBA
  • Excel Video Tutorials
  • Formatting
  • Grouping
  • Others

Logical Functions

  • Return blank if in Excel
  • OR function Examples in Excel
  • Not Equal To ‘<>‘ operator in Excel
  • TRUE function: Description, Usage, Syntax, Examples and Explanation
  • How to use IFS function in Excel

Date Time

  • How to calculate nth day of year in Excel
  • NOW function: Description, Usage, Syntax, Examples and Explanation
  • Get fiscal year from date in Excel
  • Check If Two Dates are same month in Excel
  • Display the current date and time in Excel

Grouping

  • How to randomly assign data to groups in Excel
  • Categorize text with keywords in Excel
  • Group times into unequal buckets in Excel
  • Group times into 3 hour buckets in Excel
  • How to randomly assign people to groups in Excel

General

  • How to Insert Cells, Row and Rows in Excel
  • Convert column letter to number in Excel
  • Share Excel data with Word documents
  • Excel Default Templates
  • Convert column number to letter in Excel
© 2025 xlsoffice . All Right Reserved. | Teal Smiles | Abbreviations And Their Meaning