
Skip to content
Free Excel Tutorials
  • Home
  • Excel For Beginners
  • Excel Intermediate
  • Advanced Excel For Experts

Data Analysis

  • Use Data Form to input, edit and delete records in Excel
  • Excel Bar Chart
  • Working With Tables in Excel
  • How to create Gauge Chart in Excel
  • How to calculate correlation coefficient Correlation in Excel

References

  • Offset in Excel
  • How to get relative row numbers in a range in Excel
  • Lookup entire row in Excel
  • How to use Excel VLOOKUP Function
  • How to get address of named range in Excel

Data Validations

  • Excel Data validation number multiple 100
  • Excel Data validation must begin with
  • Excel Data validation specific characters only
  • Excel Data validation don’t exceed total
  • Excel Data validation unique values only

Sum if cells are not equal to in Excel

by

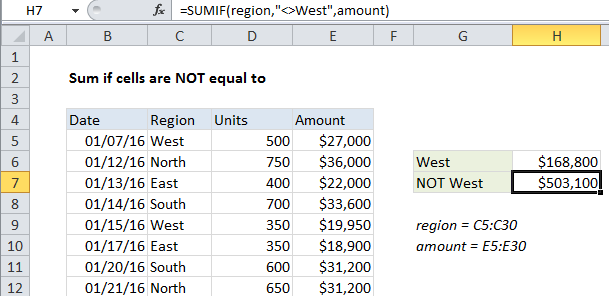
This tutorial shows how to Sum if cells are not equal to in Excel using the example below;

Formula

=SUMIF(range,"<>value",sum_range)
Explanation

To sum cells when other cells are not equal to a specific value, you can use the SUMIF function.

In the example shown, cell H7 contains this formula:

=SUMIF(region,"<>West",amount)

This formula sums the amounts in column E only when the region in column C is not “West”.

How the formula works

The SUMIF function supports all of the standard Excel operators, including not-equal-to, which is input as <>.

When you use an operator in the criteria for a function like SUMIF, you need to enclose it in double quotes (“”). In this case, the criteria is input as “<>West” which you can read as “not equal to West”, or simply “not West”.

Alternative with SUMIFS

You can also use the SUMIFS function to sum if cells are NOT blank. SUMIFS can handle multiple criteria, and the order of the arguments is different from SUMIF. The equivalent SUMIFS formula is:

=SUMIFS(amount, region,"<>West")

Notice that the sum range always comes first in the SUMIFS function.

SUMIFS allows you to easily extend the criteria to handle more than one condition if needed.

Post navigation

Previous Post:

How to use Excel CHOOSE Function

Next Post:

Customize Ribbon In Excel

Leave a Reply Cancel reply

Your email address will not be published. Required fields are marked *

Learn Basic Excel

Ribbon
Workbook
Worksheets
Format Cells
Find & Select
Sort & Filter
Templates
Print
Share
Protect
Keyboard Shortcuts

Categories

  • Charts
  • Data Analysis
  • Data Validation
  • Excel Functions
    • Cube Functions
    • Database Functions
    • Date and Time Functions
    • Engineering Functions
    • Financial Functions
    • Information Functions
    • Logical Functions
    • Lookup and Reference Functions
    • Math and Trig Functions
    • Statistical Functions
    • Text Functions
    • Web Functions
  • Excel VBA
  • Excel Video Tutorials
  • Formatting
  • Grouping
  • Others

Logical Functions

  • NOT function: Description, Usage, Syntax, Examples and Explanation
  • How to use Excel XOR Function
  • XOR function: Description, Usage, Syntax, Examples and Explanation
  • OR function: Description, Usage, Syntax, Examples and Explanation
  • How to return blank in place of #DIV/0! error in Excel

Date Time

  • TIME function: Description, Usage, Syntax, Examples and Explanation
  • Add business days to date in Excel
  • Get first day of month in Excel
  • Add days exclude certain days of week in Excel
  • How to calculate Next working/business day in Excel

Grouping

  • Group arbitrary text values in Excel
  • Categorize text with keywords in Excel
  • How to randomly assign data to groups in Excel
  • Group numbers with VLOOKUP in Excel
  • Map text to numbers in Excel

General

  • How to fill cell ranges with random text values in Excel
  • Count cells that do not contain errors in Excel
  • How to calculate profit margin percentage in Excel
  • How to calculate percentage of total in Excel
  • Excel Ribbon Quick Overview For Beginners
© 2026 xlsoffice . All Right Reserved. | Teal Smiles | Abbreviations And Their Meaning