

Skip to content
Free Excel Tutorials
  • Home
  • Excel For Beginners
  • Excel Intermediate
  • Advanced Excel For Experts

Data Analysis

  • How to Create Area Chart in Excel
  • Understanding Pivot Tables in Excel
  • How To Create Pareto Chart in Excel
  • Error Bars in Excel
  • How to Create Gantt Chart in Excel

References

  • To count total rows in a range in Excel
  • How to use Excel INDIRECT Function
  • Two-way lookup with VLOOKUP in Excel
  • How to create dynamic named range with OFFSET in Excel
  • How to use Excel ROW Function

Data Validations

  • Prevent invalid data entering in specific cells
  • Excel Data validation with conditional list
  • Excel Data validation unique values only
  • Excel Data validation date in specific year
  • Excel Data validation no punctuation

AutoFit Column Width, AutoFit Row Height in Excel

by

You probably know how to change the width of a column in Excel, but do you know how to automatically fit the widest entry in a column?

AutoFit Column Width

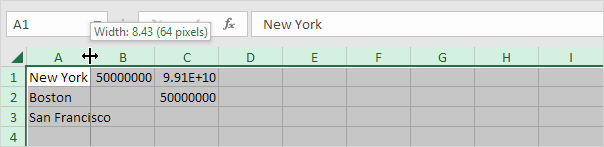
The default width of a column is 64 pixels.

1. You can change the width of a column by clicking and dragging the right border of the column header.
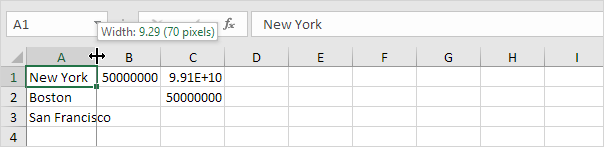

2. To automatically fit the widest entry in a column, double click the right border of a column header.
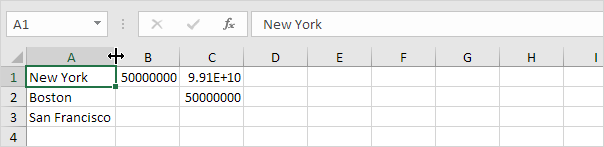

3. To autofit multiple columns, first select multiple columns by clicking and dragging over the column headers.
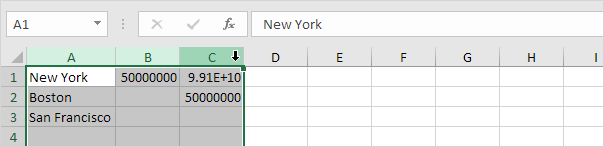
Note: to select non-adjacent columns, hold CTRL while clicking the column headers.

4. Next, double click the right border of one of the column headers.
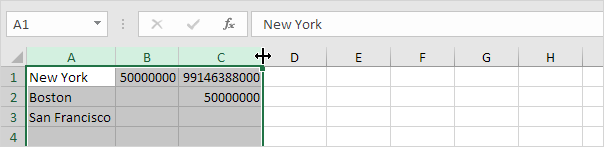
5. To change the width of all columns, first select all columns by clicking the Select All button.
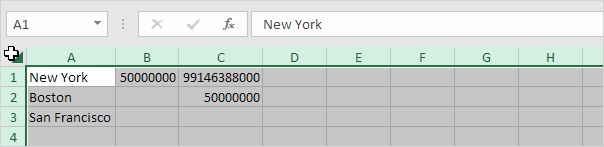
6. Next, change the width of a column.
AutoFit Row Height

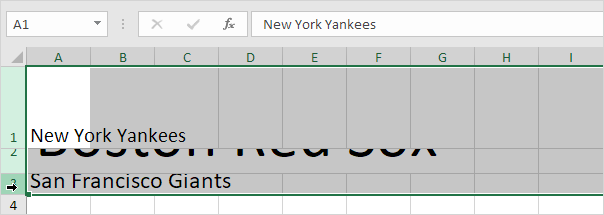
The techniques described above can also be used to change the height of a row. Instead of clicking the right border of a column header, simply click the bottom border of a row header. There’s one more way to autofit columns or rows.

1. First, select multiple rows by clicking and dragging over the row headers.
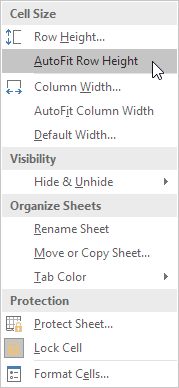
2. On the Home tab, in the Cells group, click Format.
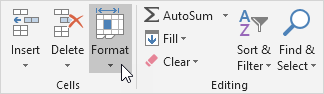
3. Click AutoFit Row Height.
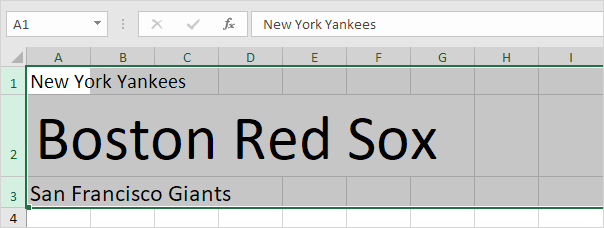
Result:
Note: you can also use this technique to set a row height or a column width (see screenshot at step 3). Be careful, don’t think in pixels here. The default width of a column is 8.43 units and the default height of a row is 15.00 units.

Post navigation

Previous Post:

VLOOKUP without #N/A error in Excel

Next Post:

Manipulating text strings using Left, Mid, Right, Len, Substitute in Excel

Leave a Reply Cancel reply

Your email address will not be published. Required fields are marked *

Learn Basic Excel

Ribbon
Workbook
Worksheets
Format Cells
Find & Select
Sort & Filter
Templates
Print
Share
Protect
Keyboard Shortcuts

Categories

  • Charts
  • Data Analysis
  • Data Validation
  • Excel Functions
    • Cube Functions
    • Database Functions
    • Date and Time Functions
    • Engineering Functions
    • Financial Functions
    • Information Functions
    • Logical Functions
    • Lookup and Reference Functions
    • Math and Trig Functions
    • Statistical Functions
    • Text Functions
    • Web Functions
  • Excel VBA
  • Excel Video Tutorials
  • Formatting
  • Grouping
  • Others

Logical Functions

  • TRUE function: Description, Usage, Syntax, Examples and Explanation
  • IF function: Description, Usage, Syntax, Examples and Explanation
  • Check multiple cells are equal in Excel
  • FALSE function: Description, Usage, Syntax, Examples and Explanation
  • How to use IFS function in Excel

Date Time

  • Display Days in month in Excel
  • How to get year from date in Excel
  • How to calculate project start date based on end date in Excel
  • Add decimal hours to time in Excel
  • Get days between dates ignoring years in Excel

Grouping

  • Group times into 3 hour buckets in Excel
  • How to randomly assign people to groups in Excel
  • If cell contains one of many things in Excel
  • Categorize text with keywords in Excel
  • Map inputs to arbitrary values in Excel

General

  • Find, Trace and Correct Errors in Excel Formulas using ‘Formula Auditing’
  • Advanced Number Formats in Excel
  • How to generate random number weighted probability in Excel
  • Sum by group in Excel
  • Create dynamic workbook reference to another workbook in Excel
© 2026 xlsoffice . All Right Reserved. | Teal Smiles | Abbreviations And Their Meaning