Skip to content
Free Excel Tutorials
  • Home
  • Excel For Beginners
  • Excel Intermediate
  • Advanced Excel For Experts

Data Analysis

  • How To Compare Two Lists in Excel
  • Conditional Formatting New Rule with Formulas in Excel
  • Understanding Pivot Tables in Excel
  • How to calculate current stock or inventory in Excel
  • Excel Pie Chart

References

  • How to use Excel COLUMN Function
  • Convert text string to valid reference in Excel using Indirect function
  • Find closest match in Excel
  • Create hyperlink with VLOOKUP in Excel
  • How to get last row in text data in Excel

Data Validations

  • Excel Data validation must contain specific text
  • Excel Data validation allow uppercase only
  • Excel Data validation specific characters only
  • Excel Data validation date in specific year
  • Excel Data validation unique values only

Use Data Form to input, edit and delete records in Excel

by

The data form in Excel allows you to add, edit and delete records (rows) and display only those records that meet certain criteria. Especially when you have wide rows and you want to avoid repeated scrolling to the right and left, the data form can be useful.

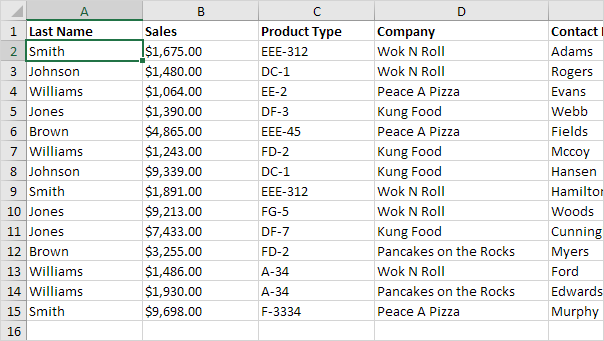
1. Open the downloadable Excel file.

2. Add the Form command to the Quick Access Toolbar.

3. Click the Form command.

4. Use the Find Prev and Find Next buttons to easily switch from one record (row) to another.

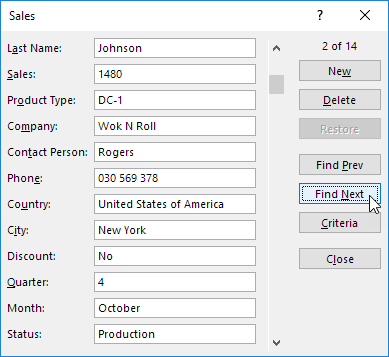
Note: use the New or Delete button to add or delete records. Once you start editing a record, you can use the Restore button to undo any changes you make.

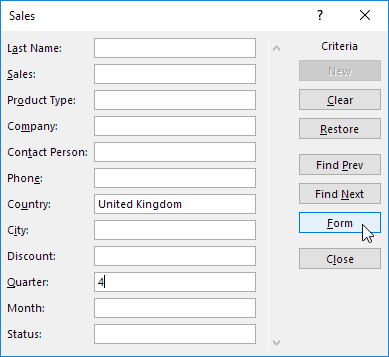
5. To display only those records that meet certain criteria, click the Criteria button.

6. Enter the criteria and click the Form button.

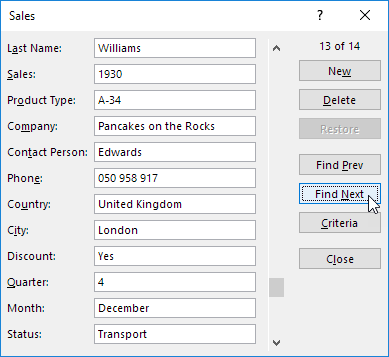
7. Now, when you use the Find Prev and Find Next buttons, you will only see those records that meet these criteria. In our example, only record 13.

Note: to edit the criteria, click the Criteria button again. To close the data form, click the Close button.

Post navigation

Previous Post:

COSH function: Description, Usage, Syntax, Examples and Explanation

Next Post:

Excel Data validation require unique number

Leave a Reply Cancel reply

Your email address will not be published. Required fields are marked *

Learn Basic Excel

Ribbon
Workbook
Worksheets
Format Cells
Find & Select
Sort & Filter
Templates
Print
Share
Protect
Keyboard Shortcuts

Categories

  • Charts
  • Data Analysis
  • Data Validation
  • Excel Functions
    • Cube Functions
    • Database Functions
    • Date and Time Functions
    • Engineering Functions
    • Financial Functions
    • Information Functions
    • Logical Functions
    • Lookup and Reference Functions
    • Math and Trig Functions
    • Statistical Functions
    • Text Functions
    • Web Functions
  • Excel VBA
  • Excel Video Tutorials
  • Formatting
  • Grouping
  • Others

Logical Functions

  • IF with wildcards in Excel
  • How to return blank in place of #DIV/0! error in Excel
  • AND function: Description, Usage, Syntax, Examples and Explanation
  • IF with boolean logic in Excel
  • How to use Excel AND Function

Date Time

  • Basic timesheet formula with breaks in Excel
  • How to get year from date in Excel
  • SECOND function: Description, Usage, Syntax, Examples and Explanation
  • Add days exclude certain days of week in Excel
  • Convert Excel time to decimal seconds

Grouping

  • Running count group by n size in Excel
  • Calculate conditional mode with criteria in Excel
  • Group numbers at uneven intervals in Excel
  • Categorize text with keywords in Excel
  • If cell contains one of many things in Excel

General

  • AutoRecover file that was never saved in Excel
  • How to get original price from percentage discount in Excel
  • How to calculate total from percentage in Excel
  • Convert column number to letter in Excel
  • How to get original number from percent change in Excel
© 2026 xlsoffice . All Right Reserved. | Teal Smiles | Abbreviations And Their Meaning