Skip to content
Free Excel Tutorials
  • Home
  • Excel For Beginners
  • Excel Intermediate
  • Advanced Excel For Experts

Data Analysis

  • How to conditionally sum numeric data in an Excel table using SUMIFS
  • How to Create Column Chart in Excel
  • Example of COUNTIFS with variable table column in Excel
  • How to create dynamic reference table name in Excel
  • Excel Pie Chart

References

  • Count unique text values with criteria
  • Last row number in range
  • Create hyperlink with VLOOKUP in Excel
  • How to use Excel ROW Function
  • How to get address of first cell in range in Excel

Data Validations

  • Excel Data validation exists in list
  • Data validation must not exist in list
  • Excel Data validation allow uppercase only
  • Excel Data validation no punctuation
  • Excel Data validation must begin with

If else in Excel

by

This tutorial shows how to calculate If else in Excel using the example below;

Formula

=IF(test, true result, false result)

Explanation

If you need to test a condition, then take one action if the condition is TRUE, and another action if the condition if FALSE, you can use the IF function.

Context

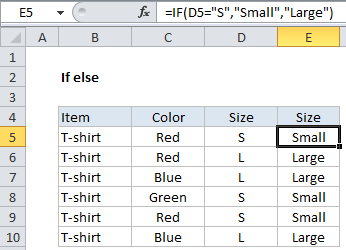
In the example shown, we have a list of T-shirts that includes color and size. However, the size is abbreviated as “S” for small and “L” for large. Lets say you want to write a formula to expand these abbreviations and show either the word “Small” or “Large” in column E. In other words:

  1. If a cell in column D contains “S”, return “Small”.
  2. If a cell in column D contains “L”, return “Large”.

This is a perfect application of the IF function.

Solution

The IF function is organized like this:

=IF(test, true result, false result)

In the example, we need to test cells in column D to see what they contain, so the formula we are using in cell E5 is:

=IF(D5="S","Small","Large")

Translated, this says:

IF cell D5 equals (contains) the letter “S”, return the word “Small”, ELSE return the word “Large”.

Notice we are only testing for “S” — we don’t need to test for “L”. That’s because we only have two possible values, and the ELSE part of the formula (the FALSE result) logically takes care of “L” for us: if the cell doesn’t contain “S”, it must be “L”.

Nesting IFs to handle more conditions

This works fine for two conditions, but what if we have a third condition?, for example, “M” for “Medium”?

In that case, we need to extend the formula with another IF statement. We put the second IF statement, replacing the false result.

In the example below, we’ve added another size (Medium). The formula we are using in E5 is:

=IF(D5="S","Small",IF(D5="M","Medium","Large"))

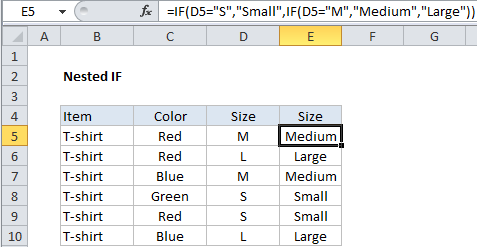
This technique is called “nesting”, since we are placing on function inside another. With it is used with the IF function, you’ll sometimes hear it called a “Nested IF statement”.

Post navigation

Previous Post:

COSH function: Description, Usage, Syntax, Examples and Explanation

Next Post:

Excel Data validation require unique number

Leave a Reply Cancel reply

Your email address will not be published. Required fields are marked *

Learn Basic Excel

Ribbon
Workbook
Worksheets
Format Cells
Find & Select
Sort & Filter
Templates
Print
Share
Protect
Keyboard Shortcuts

Categories

  • Charts
  • Data Analysis
  • Data Validation
  • Excel Functions
    • Cube Functions
    • Database Functions
    • Date and Time Functions
    • Engineering Functions
    • Financial Functions
    • Information Functions
    • Logical Functions
    • Lookup and Reference Functions
    • Math and Trig Functions
    • Statistical Functions
    • Text Functions
    • Web Functions
  • Excel VBA
  • Excel Video Tutorials
  • Formatting
  • Grouping
  • Others

Logical Functions

  • Excel If, Nested If, And/Or Criteria Examples
  • How to use Excel OR Function
  • How to use Excel AND Function
  • IF, AND, OR and NOT Functions Examples in Excel
  • How to use Excel FALSE Function

Date Time

  • Count holidays between two dates in Excel
  • Display Days in month in Excel
  • Count day of week between dates in Excel
  • Sum through n months in Excel
  • Get days, hours, and minutes between dates in Excel

Grouping

  • Group numbers with VLOOKUP in Excel
  • Group numbers at uneven intervals in Excel
  • Running count group by n size in Excel
  • Group times into unequal buckets in Excel
  • Group times into 3 hour buckets in Excel

General

  • How to increase by percentage in Excel
  • Basic text sort formula in Excel
  • How to calculate percent change in Excel
  • How to Delete Cells, Row and Rows in Excel
  • How to generate random number weighted probability in Excel
© 2026 xlsoffice . All Right Reserved. | Teal Smiles | Abbreviations And Their Meaning