Skip to content
Free Excel Tutorials
  • Home
  • Excel For Beginners
  • Excel Intermediate
  • Advanced Excel For Experts

Data Analysis

  • Conditional Formatting New Rule with Formulas in Excel
  • How to Use Solver Tool in Excel
  • Excel Frequency Function Example
  • How to calculate correlation coefficient Correlation in Excel
  • How To Filter Data in Excel

References

  • How to use Excel TRANSPOSE Function
  • Multi-criteria lookup and transpose in Excel
  • How to get relative row numbers in a range in Excel
  • VLOOKUP function: Description, Usage, Syntax, Examples and Explanation
  • Lookup entire row in Excel

Data Validations

  • Excel Data validation date in specific year
  • Excel Data validation date in next 30 days
  • Excel Data validation unique values only
  • Excel Data validation allow weekday only
  • Excel Data validation specific characters only

Print Excel Sheet In Landscape Or Portrait

by

Excel can fit three more columns of information on the page in landscape mode than it can in portrait mode. By default, paper orientation is mostly portrait. This article shows how to change paper orientation in Excel before printing a worksheet or workbook.

Print a worksheet in landscape or portrait orientation

Steps to change page orientation in Excel

Because many worksheets are wider than they are tall (such as budgets or sales tables that track expenditures over a period of time), you may find the need to switch the orientation from the default portrait mode to landscape mode.

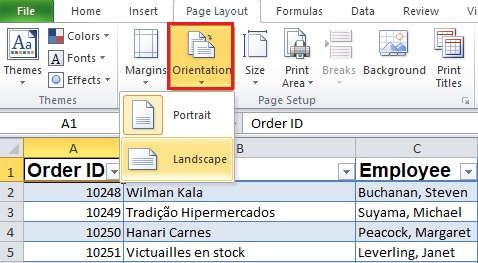
a. Page Layout tab → Page Setup group → Orientation button reveals a drop-down menu with these two options:

  • Portrait
  • Landscape


For report,  portrait orientation may work better.

b. Change the page orientation when you are ready to print

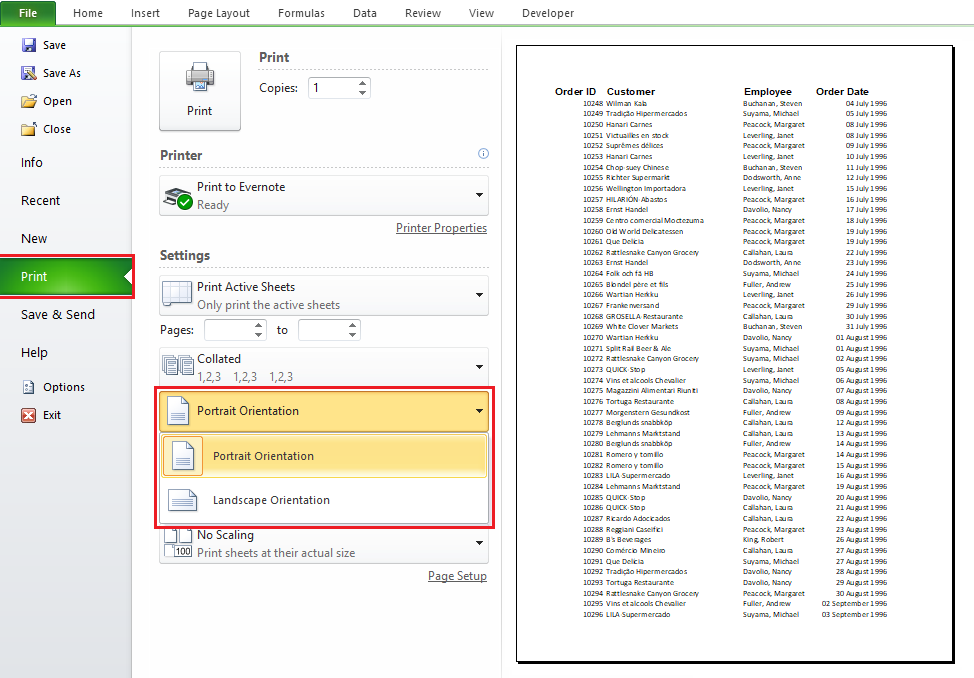
  1. Select the worksheet, worksheets, or worksheet data that you want to print.

  2. Click File > Print.
  3. In the Page Orientation drop-down box, under Settings, click Portrait Orientation or Landscape Orientation.
  4. When you are ready to print, click Print.

Post navigation

Previous Post:

TRUE function: Description, Usage, Syntax, Examples and Explanation

Next Post:

Excel Pie Chart

Leave a Reply Cancel reply

Your email address will not be published. Required fields are marked *

Learn Basic Excel

Ribbon
Workbook
Worksheets
Format Cells
Find & Select
Sort & Filter
Templates
Print
Share
Protect
Keyboard Shortcuts

Categories

  • Charts
  • Data Analysis
  • Data Validation
  • Excel Functions
    • Cube Functions
    • Database Functions
    • Date and Time Functions
    • Engineering Functions
    • Financial Functions
    • Information Functions
    • Logical Functions
    • Lookup and Reference Functions
    • Math and Trig Functions
    • Statistical Functions
    • Text Functions
    • Web Functions
  • Excel VBA
  • Excel Video Tutorials
  • Formatting
  • Grouping
  • Others

Logical Functions

  • IF with boolean logic in Excel
  • IF, AND, OR and NOT Functions Examples in Excel
  • OR function: Description, Usage, Syntax, Examples and Explanation
  • How to use Excel OR Function
  • How to use Excel NOT Function

Date Time

  • Extract date from a date and time in Excel
  • How to calculate months between dates in Excel
  • Next biweekly payday from date in Excel
  • How to calculate percent of year complete in Excel
  • Convert date string to date time in Excel

Grouping

  • How to randomly assign data to groups in Excel
  • Map text to numbers in Excel
  • How to randomly assign people to groups in Excel
  • Group times into 3 hour buckets in Excel
  • Group times into unequal buckets in Excel

General

  • Subtotal by color in Excel
  • Excel Ribbon Quick Overview For Beginners
  • How to test a range for numbers in Excel
  • Select, Insert, Rename, Move, Delete Worksheets in Excel
  • AutoFit Column Width, AutoFit Row Height in Excel
© 2026 xlsoffice . All Right Reserved. | Teal Smiles | Abbreviations And Their Meaning