
Skip to content
Free Excel Tutorials
  • Home
  • Excel For Beginners
  • Excel Intermediate
  • Advanced Excel For Experts

Data Analysis

  • How To Sort One Column or Multiple Columns in Excel
  • Understanding Pivot Tables in Excel
  • How to create Gauge Chart in Excel
  • What-If Analysis: Scenarios and Goal Seek in Excel
  • How To Create Frequency Distribution in Excel

References

  • Approximate match with multiple criteria in Excel
  • To count total rows in a range in Excel
  • How to use Excel OFFSET function
  • How to use Excel LOOKUP Function
  • How to reference named range different sheet in Excel

Data Validations

  • Excel Data validation date in next 30 days
  • Data validation must not exist in list
  • Excel Data validation must begin with
  • Excel Data validation exists in list
  • Prevent invalid data entering in specific cells

Count dates in given year in Excel

by

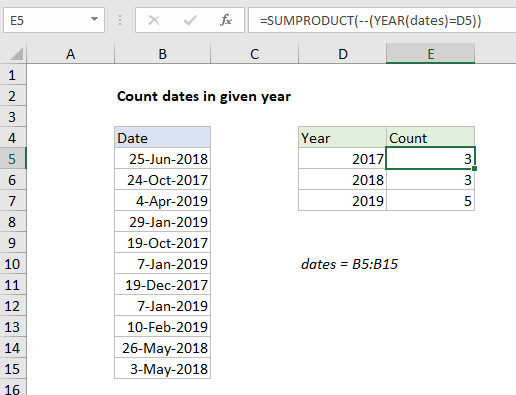
This tutorial shows how to Count dates in given year in Excel using the example below;

Formula

=SUMPRODUCT(--(YEAR(dates)=year))
Explanation

To count dates in a given year, you can use the SUMPRODUCT and YEAR functions. In the example shown, the formula in E5 is:

=SUMPRODUCT(--(YEAR(dates)=D5))

where “dates” the a named range B5:B15.

How this formula works

The YEAR function extracts the year from a valid date. In this case, we are giving YEAR and array of dates in the named range “dates”, so we get back an array of results:

{2018;2017;2019;2019;2017;2019;2017;2019;2019;2018;2018}

Each date is compared to the year value in column D, to produce an array or TRUE FALSE values:

{FALSE;TRUE;FALSE;FALSE;TRUE;FALSE;TRUE;FALSE;FALSE;FALSE;FALSE}

For the formula in E5, TRUE values are cases where dates are in the year 2017, and FALSE values represent dates in any other year.

Next, we use a double negative to coerce the TRUE FALSE values to 1’s and 0’s. Inside SUMPRODUCT, we now have:

=SUMPRODUCT({0;1;0;0;1;0;1;0;0;0;0})

Finally, with only one array to work with, SUMPRODUCT sums the items in the array and returns a result, 3.

Post navigation

Previous Post:

How to use Excel CHOOSE Function

Next Post:

Customize Ribbon In Excel

Leave a Reply Cancel reply

Your email address will not be published. Required fields are marked *

Learn Basic Excel

Ribbon
Workbook
Worksheets
Format Cells
Find & Select
Sort & Filter
Templates
Print
Share
Protect
Keyboard Shortcuts

Categories

  • Charts
  • Data Analysis
  • Data Validation
  • Excel Functions
    • Cube Functions
    • Database Functions
    • Date and Time Functions
    • Engineering Functions
    • Financial Functions
    • Information Functions
    • Logical Functions
    • Lookup and Reference Functions
    • Math and Trig Functions
    • Statistical Functions
    • Text Functions
    • Web Functions
  • Excel VBA
  • Excel Video Tutorials
  • Formatting
  • Grouping
  • Others

Logical Functions

  • IFS function: Description, Usage, Syntax, Examples and Explanation
  • AND function: Description, Usage, Syntax, Examples and Explanation
  • Nested IF function example in Excel
  • Check multiple cells are equal in Excel
  • How to use Excel XOR Function

Date Time

  • DATEDIF function: Description, Usage, Syntax, Examples and Explanation
  • Extract date from a date and time in Excel
  • Convert date to Julian format in Excel
  • How to get workdays between dates in Excel
  • Extract time from a date and time in Excel

Grouping

  • Map text to numbers in Excel
  • Map inputs to arbitrary values in Excel
  • Group times into unequal buckets in Excel
  • Group numbers with VLOOKUP in Excel
  • Group times into 3 hour buckets in Excel

General

  • How to fill cell ranges with random text values in Excel
  • How to calculate percentage discount in Excel
  • Count cells less than in Excel
  • Count cells that do not contain many strings in Excel
  • Split Cell Content Using Text to Columns in Excel
© 2026 xlsoffice . All Right Reserved. | Teal Smiles | Abbreviations And Their Meaning