Skip to content
Free Excel Tutorials
  • Home
  • Excel For Beginners
  • Excel Intermediate
  • Advanced Excel For Experts

Data Analysis

  • How to Create One and Two Variable Data Tables in Excel
  • Calculate Conditional Percentile ‘IF’ in table in Excel
  • How to Create Gantt Chart in Excel
  • Excel Pie Chart
  • Managing Conditional Formatting Rules in Excel

References

  • How to use Excel TRANSPOSE Function
  • How to reference named range different sheet in Excel
  • How to get first row number in range in Excel
  • Two-column Lookup in Excel
  • How to use Excel FORMULATEXT function

Data Validations

  • How To Create Drop-down List in Excel
  • Excel Data validation only dates between
  • Excel Data validation must contain specific text
  • Excel Data validation unique values only
  • Excel Data validation allow uppercase only

Make Workbook Read-only in Excel

by

This example shows you how to make your workbook read-only. Users can still save changes by creating a new copy of the workbook. For a better protection, protect a sheet.

1. Open a workbook.

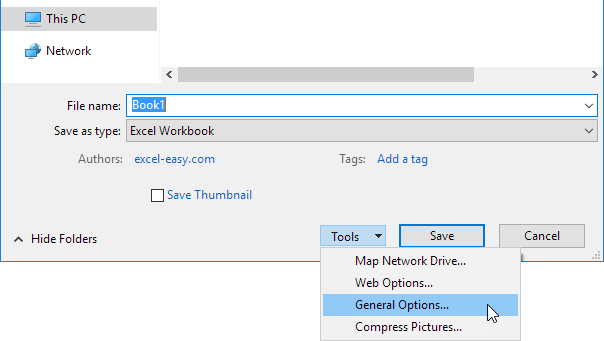
2. On the File tab, click Save As.

3. Click Browse.

4. Click on the Tools button and click General Options.

5. In the Password to modify box, enter a password and click OK.

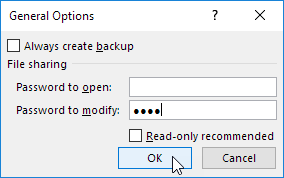
Note: If you only want to recommend users to open the Excel file as read-only, without protecting it, don’t enter a password and check Read-only recommended.

6. Reenter the password and click on OK.

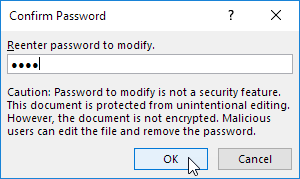
Note: this feature does not encrypt your Excel file. Malicious users can edit the file and remove the password.

7. Enter a file name and click Save.

Your workbook is read-only now. The password for the downloadable Excel file is “easy”

Post navigation

Previous Post:

VLOOKUP without #N/A error in Excel

Next Post:

Manipulating text strings using Left, Mid, Right, Len, Substitute in Excel

Leave a Reply Cancel reply

Your email address will not be published. Required fields are marked *

Learn Basic Excel

Ribbon
Workbook
Worksheets
Format Cells
Find & Select
Sort & Filter
Templates
Print
Share
Protect
Keyboard Shortcuts

Categories

  • Charts
  • Data Analysis
  • Data Validation
  • Excel Functions
    • Cube Functions
    • Database Functions
    • Date and Time Functions
    • Engineering Functions
    • Financial Functions
    • Information Functions
    • Logical Functions
    • Lookup and Reference Functions
    • Math and Trig Functions
    • Statistical Functions
    • Text Functions
    • Web Functions
  • Excel VBA
  • Excel Video Tutorials
  • Formatting
  • Grouping
  • Others

Logical Functions

  • Nested IF function example in Excel
  • SWITCH function: Description, Usage, Syntax, Examples and Explanation
  • How to use Excel FALSE Function
  • XOR function: Description, Usage, Syntax, Examples and Explanation
  • Return blank if in Excel

Date Time

  • Convert Excel time to decimal minutes
  • NETWORKDAYS.INTL function: Description, Usage, Syntax, Examples and Explanation
  • WEEKDAY function: Description, Usage, Syntax, Examples and Explanation
  • Get days between dates ignoring years in Excel
  • Create date range from two dates in Excel

Grouping

  • Running count group by n size in Excel
  • Map text to numbers in Excel
  • How to randomly assign people to groups in Excel
  • If cell contains one of many things in Excel
  • Group times into 3 hour buckets in Excel

General

  • Excel Autofill Cell Ranges, Copy, Paste
  • How to generate random times at specific intervals in Excel
  • Basic error trapping example in Excel
  • Count cells less than in Excel
  • Transpose: Switch ‘Rows to Columns’ or ‘Columns to Rows’ in Excel
© 2026 xlsoffice . All Right Reserved. | Teal Smiles | Abbreviations And Their Meaning