
Skip to content
Free Excel Tutorials
  • Home
  • Excel For Beginners
  • Excel Intermediate
  • Advanced Excel For Experts

Data Analysis

  • How to Create Area Chart in Excel
  • How To Create Pareto Chart in Excel
  • How to create a Histogram in Excel
  • Chart Axes in Excel
  • How to create Checklist in Excel

References

  • Two-way lookup with VLOOKUP in Excel
  • Merge tables with VLOOKUP in Excel
  • How to get relative column numbers in a range in Excel
  • How to use Excel LOOKUP Function
  • Convert text string to valid reference in Excel using Indirect function

Data Validations

  • Excel Data validation must begin with
  • Prevent invalid data entering in specific cells
  • Data validation must not exist in list
  • How To Create Drop-down List in Excel
  • Excel Data validation only dates between

Understanding Named Range, Named Constant, Name Manager in Excel Formulas

by

By using names  you can make your formulas much easier to understand and maintain i.e to update, audit, and manage.

You can define a name for a cell range, function, constant, or table.

Name: A word or string of characters in Excel that represents a cell, range of cells, formula, or constant value.

Named Range

To create a named range, execute the following steps.

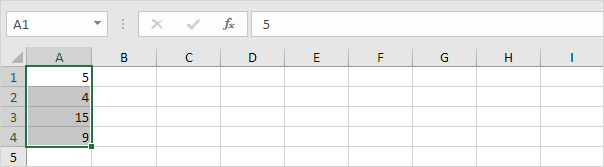
1. Select the range A1:A4.
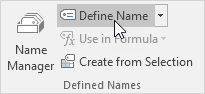
2. On the Formulas tab, in the Defined Names group, click Define Name.
3. Enter a name and click OK.
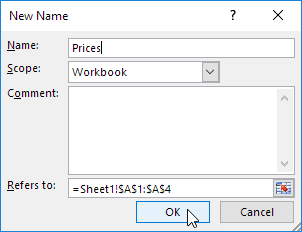
There’s an even quicker way of doing this.

4. Select the range, type the name in the Name box and press Enter.

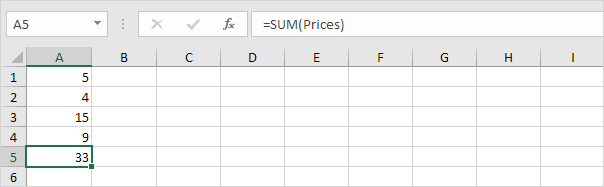
5. Now you can use this named range in your formulas. For example, sum Prices.
Named Constant

To create a named constant, execute the following steps.

1. On the Formulas tab, in the Defined Names group, click Define Name.

2. Enter a name, type a value, and click OK.
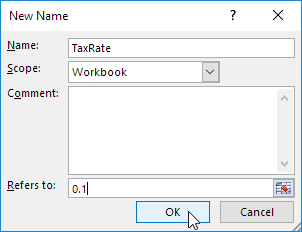
3. Now you can use this named constant in your formulas.
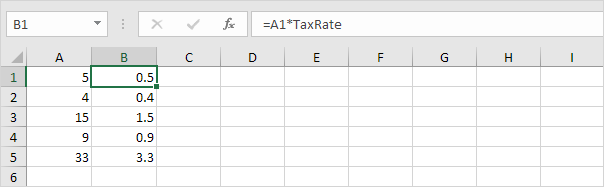
Note: if the tax rate changes, use the Name Manager to edit the name and Excel automatically updates all the formulas that use TaxRate.

Name Manager

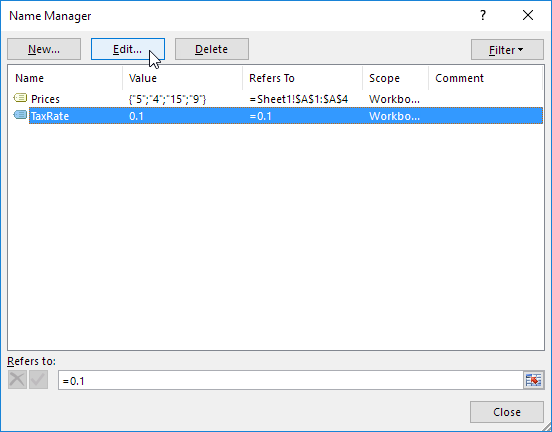
To edit and delete defined names, execute the following steps.

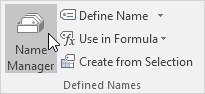
1. On the Formulas tab, in the Defined Names group, click Name Manager.
2. For example, select TaxRate and click Edit.
Post navigation

Previous Post:

TRUE function: Description, Usage, Syntax, Examples and Explanation

Next Post:

Excel Pie Chart

Leave a Reply Cancel reply

Your email address will not be published. Required fields are marked *

Learn Basic Excel

Ribbon
Workbook
Worksheets
Format Cells
Find & Select
Sort & Filter
Templates
Print
Share
Protect
Keyboard Shortcuts

Categories

  • Charts
  • Data Analysis
  • Data Validation
  • Excel Functions
    • Cube Functions
    • Database Functions
    • Date and Time Functions
    • Engineering Functions
    • Financial Functions
    • Information Functions
    • Logical Functions
    • Lookup and Reference Functions
    • Math and Trig Functions
    • Statistical Functions
    • Text Functions
    • Web Functions
  • Excel VBA
  • Excel Video Tutorials
  • Formatting
  • Grouping
  • Others

Logical Functions

  • Extract multiple matches into separate rows in Excel
  • IF with boolean logic in Excel
  • OR function Examples in Excel
  • NOT function: Description, Usage, Syntax, Examples and Explanation
  • IFNA function: Description, Usage, Syntax, Examples and Explanation

Date Time

  • Get days between dates in Excel
  • Get work hours between dates in Excel
  • Generate series of dates by weekends in Excel
  • Find Last Day of the Month in Excel
  • Count holidays between two dates in Excel

Grouping

  • Group arbitrary text values in Excel
  • Categorize text with keywords in Excel
  • Map inputs to arbitrary values in Excel
  • Map text to numbers in Excel
  • Group times into unequal buckets in Excel

General

  • Hide and Unhide Columns or Rows in Excel
  • Excel Operators
  • Advanced Number Formats in Excel
  • Excel Autofill Cell Ranges, Copy, Paste
  • How to choose page/paper size in Excel before Printing
© 2026 xlsoffice . All Right Reserved. | Teal Smiles | Abbreviations And Their Meaning